串口开发与综合应用 Linux原生串口开发首先实现一个自定义的uartTool.c替代wiringPi.c,主要实现三个方法:串口打开、数据发送和数据接收,照例使用两个不同线程分别进行发送和接收:
点击展开
1 2 3 4 5 6 7 8 9 10 11 12 13 14 15 16 17 18 19 20 21 22 23 24 25 26 27 28 29 30 31 32 33 34 35 36 37 38 39 40 41 42 43 44 45 46 47 48 49 50 51 52 53 54 55 56 57 58 59 60 61 62 63 64 65 66 67 68 69 70 71 72 73 74 75 76 77 #include <stdio.h> #include <stdlib.h> #include <stdint.h> #include <stdarg.h> #include <string.h> #include <termios.h> #include <unistd.h> #include <fcntl.h> #include <sys/ioctl.h> #include <sys/types.h> #include <sys/stat.h> #include "wiringSerial.h" char searialGetchar (const int fd) char x;if (read(fd,&x,1 ) != 1 )return -1 ;return x;int mySerialOpen (const char *device, const int baud) {struct termios options ;speed_t myBaud ;int status, fd ;switch (baud)case 9600 : myBaud = B9600 ; break ;case 115200 : myBaud = B115200 ; break ;default :return -2 ;if ((fd = open(device, O_RDWR | O_NOCTTY | O_NDELAY | O_NONBLOCK)) == -1 ) return -1 ;0 ;100 ; 10000 ) ; return fd ; int mySerialSendStr (const int fd, const char *s) {int ret;strlen (s));if (ret < 0 ) {printf ("Serial Puts Error\n" );int mySerialGetStr (const int fd, char *buffer) {int n_read;32 );return n_read;
然后编写一个测试文件uartTest.c:
1 2 3 4 5 6 7 8 9 10 11 12 13 14 15 16 17 18 19 20 21 22 23 24 25 26 27 28 29 30 31 32 33 34 35 36 37 38 39 40 41 42 43 44 45 46 47 48 49 50 51 52 53 54 55 56 #include <stdio.h> #include <stdlib.h> #include <stdint.h> #include <stdarg.h> #include <string.h> #include <termios.h> #include <unistd.h> #include <fcntl.h> #include <sys/ioctl.h> #include <sys/types.h> #include <sys/stat.h> #include <unistd.h> #include <pthread.h> #include "uartTool.h" int fd;void * readSerial () char buffer[32 ];while (1 ){memset (buffer, '10' ,sizeof (buffer));printf ("GET: %s\n" ,buffer);void * sendSerial () char buffer[32 ];while (1 ){memset (buffer, '10' ,sizeof (buffer));scanf ("%s" ,buffer);int main (int argc, char **argv) {char deviceName[32 ] = {'\0' };pthread_t readt;pthread_t sendt;if (argc < 2 ){printf ("uage:%s /dev/ttyS?\n" ,argv[0 ]);return -1 ;strcpy (deviceName,argv[1 ]);if ( (fd=mySerialOpen(deviceName,115200 )) == -1 ){printf ( "open %s error\n" ,deviceName);return -1 ;NULL ,readSerial,NULL );NULL ,sendSerial,NULL );while (1 ){10 );
使用gcc uartTest.c uartTool.c -lpthread进行编译,使用串口助手进行测试,与wiringPi库实现的效果一致。
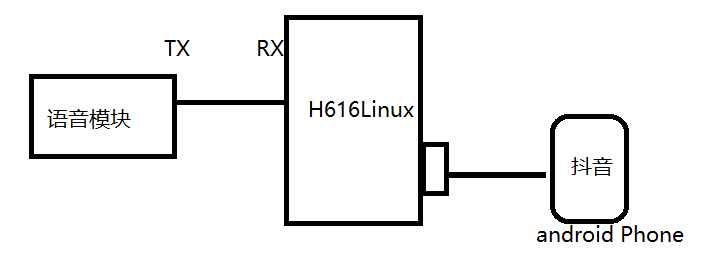
串口综合应用 ——语音模块数据交互(语音指令刷抖音)
原理认识与固件准备 首先看一下整体原理图:
语音模块通过串口连接到香橙派开发板,开发板再通过USB数据线连接安卓手机(提前打开抖音);当人发出语音指令(上一个、下一个、点赞、收藏等)时,语音模块识别指令并传递给开发板,开发板获得识别结果,再通过adb指令向安卓手机发送控制命令,从而实现语音刷抖音
至于语音模块识别声音指令的具体过程,需要涉及语音的算法、一些驱动知识等,目前阶段还没有学习的必要,也没有那个学习成本,因此我们借助一个第三方开发平台:智能公元 (一个AIOT快速产品化平台)自动生成语音识别的软件模块。
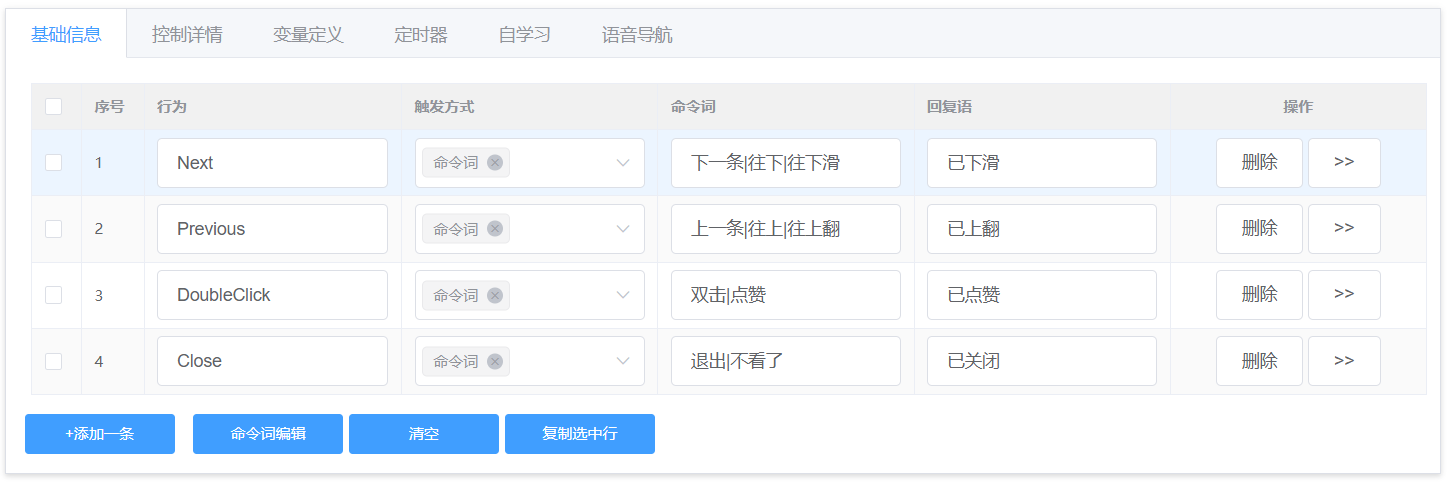
进入官网注册账号后点击创建产品,任意选择产品类别如RGB灯,纯离线方案+SU-03T模组,确认后进入语音SDK配置界面。这一步主要配置唤醒词、触发行为、发送数据等
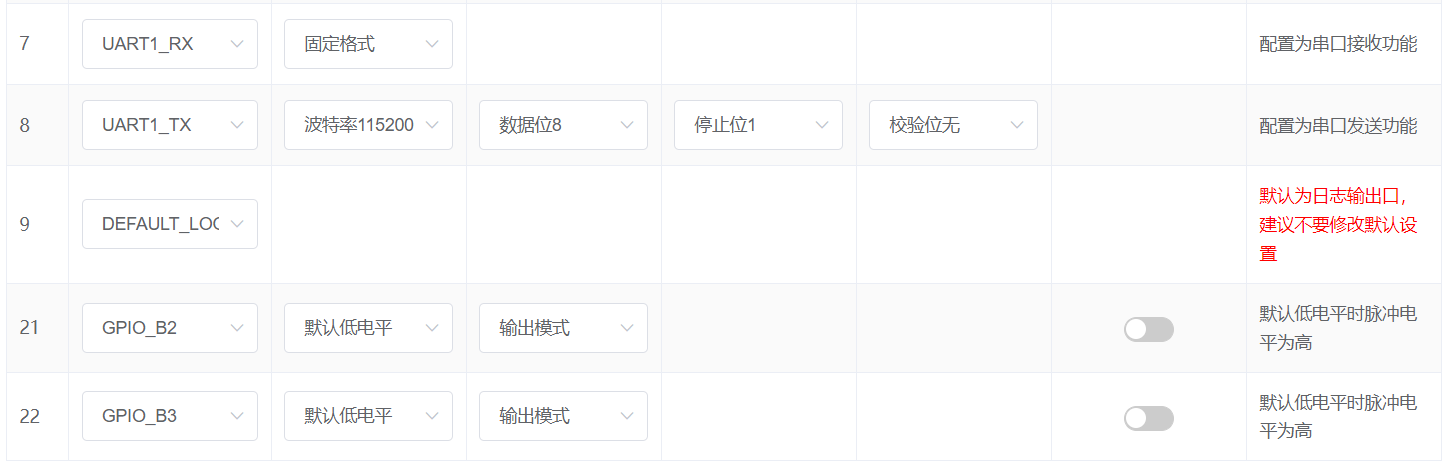
Pin脚配置 ,注意7、8号口的功能配置为Uart串口通信:
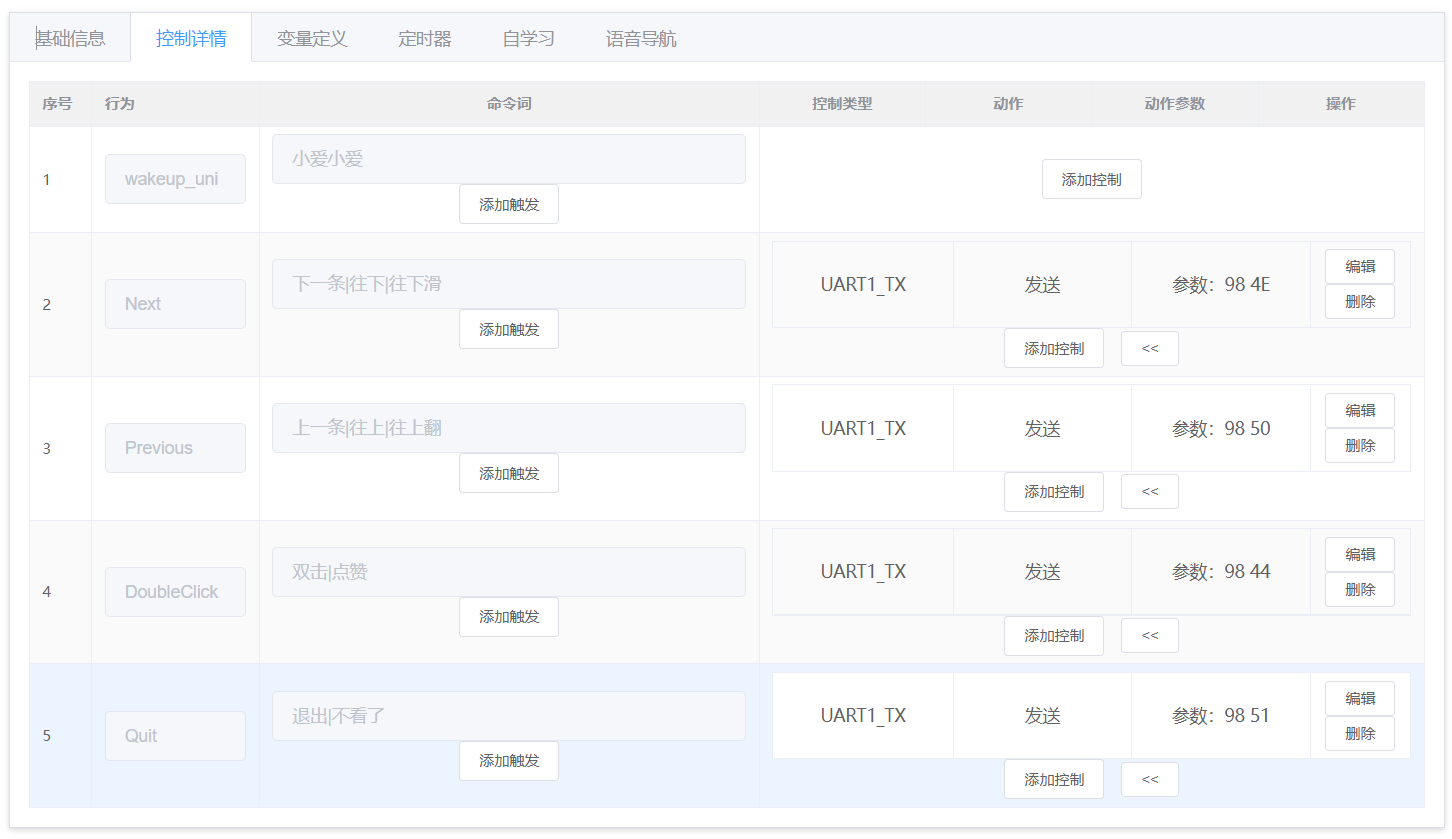
应答控制详情,这里我们选择“输出”行为并设置每条应答时通过串口发送十六进制数据,比如“Next”就发送“98 4E”,“Quit”就发送“98 51”。
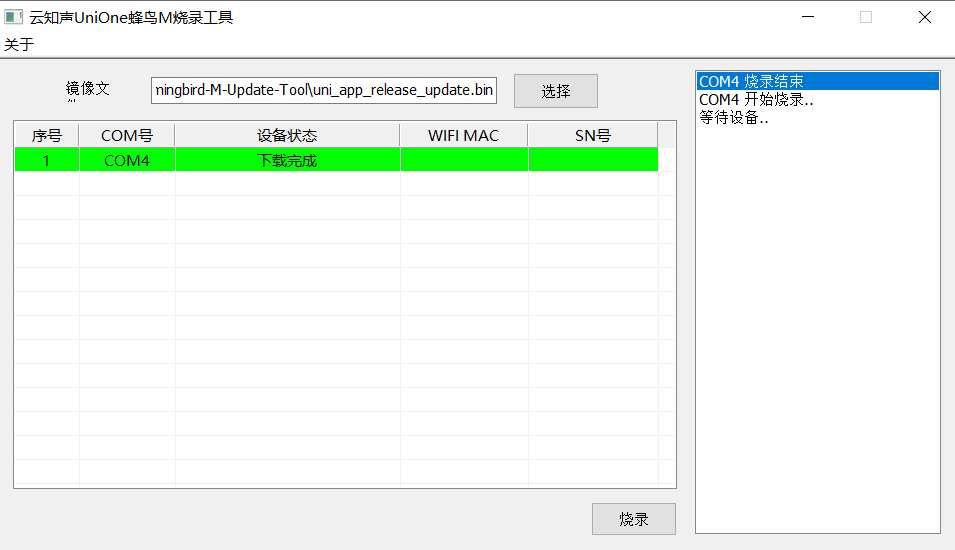
设置好产品后,生成语音SDK并下载,解压资源包进入image_demo/Hummingbird-M-Update-Tool,找到UniOneUpdateTool.exe,稍后我们将借助其实现烧录
将语音模块通过USB-TTL转接线连接到串口(接线参考:语音模块B6作接收连接转接线TX,B7作发送连接转接线RX,语音模块VCC接转接线的5V口,GND接GND),
打开上面所述烧录工具,选择正确的语音文件,点击烧录(烧录过程前需给模块先断电再上电),等待半分钟左右即可完成
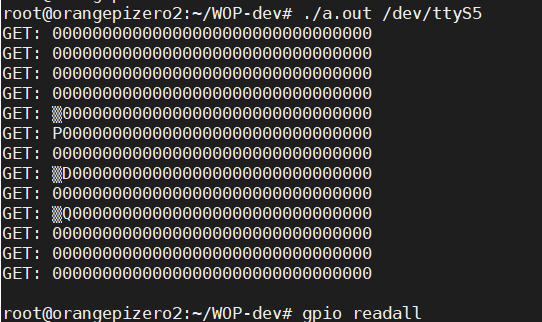
语言测试与语音指令识别流程框架 我们将烧录好的语音模块通过TXD.5和RXD.5连接至开发板,上电后就能听到模块的欢迎语。我们再使用前面开发的uarTest.c、uartTool.c、uartTest.h编译生成测试文件,然后使用./a.out /dev/ttyS5打开串口查看语音模块的输出:
可以看到虽然有出书,但我们只能够看到前一个字符,整体是乱码的。
我们将其进行修改让它显示出我们想要的指令。还是参考WiringPi官方库中的代码:
1
2
3
4
5
6
7
char mySerialGetChar (const int fd) char x;if (read(fd,&x,1 ) != 1 )return -1 ;return x;
相应地优化、精简指令控制函数 :
1 2 3 4 5 6 7 8 9 10 11 12 13 14 15 16 17 18 19 20 21 22 23 24 25 26 27 28 29 30 31 32 33 34 35 36 37 38 39 40 41 42 43 44 void * readSerial () char cmd;while (1 ){printf ("GET->0x%c\n" ,cmd);switch (cmd){case 'N' :printf ("next\n" );break ;case 'P' :printf ("previous\n" );break ;case 'D' :printf ("Double\n" );break ;case 'Q' :printf ("Quit\n" );break ;default :break ;int main (int argc, char **argv) char deviceName[32 ] = {'\0' };pthread_t readt;if (argc < 2 ){printf ("uage:%s /dev/ttyS?\n" ,argv[0 ]);return -1 ;strcpy (deviceName, argv[1 ]);if ( (fd = myserialOpen(deviceName, 115200 )) == -1 ){printf ("open %s error\n" ,deviceName);return -1 ;NULL , readSerial,NULL );while (1 ){10 );
接下来,我们就根据此uartTest运行过程中的输出,来控制手机(上方运行效果图略)。
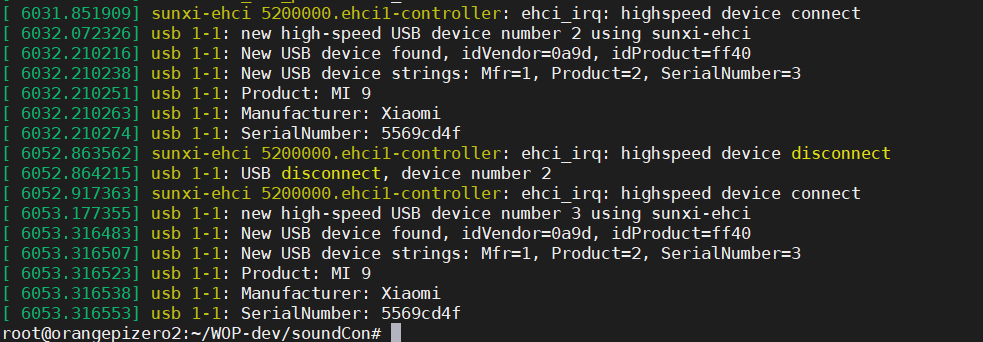
安卓手机连接Linux系统以及adb指令测试 使用usb数据线将安卓手机连接至开发板。如果正常的话使用dmesg命令应该能够看到如下信息:
可以看到我的手机被识别为MI 9,但要想控制手机仅在普通命令行是无法实现的。我们还需要借助一些工具
安装adb(Android Debug Bridge)。由于安卓手机底层也是基于Linux内核,所以我们直接在开发板上命令行安装adb即可
安卓手机允许**USB调试**,此项功能需开启手机的开发者选项才能找到
允许USB调试后开启USB调试(安全设置)
有的手机可能会遇到insufficient permissions for device的问题,解决方法就是在/etc/udev/rules.d目录下,新建一个权限文件,内容为:SUBSYSTEM=="usb",ENV{DEVTYPE}=="usb_device",MODE="0666",改文件为usb连接的设备都开启了666权限
此时我们使用adb devices就可看到我们的设备,并可使用adb shell创建一个控制终端。
在此界面,我们执行的命令就真正能传到手机了。
关于adb操作安卓手机,模拟操作,一般有这么几种类型:
模拟屏幕滑动,adb shell input swipe 540 1300 540 500 100 ,表示从坐标点(540,1300)用100ms滑动到坐标点(540,500),其他方向滑动类似
屏幕点击,adb shell input tap 350 1050 & input tap 350 1050
锁屏,adb shell input keyevent 26 ,这里是利用了手机的事件event
程序与adb命令整合 我们借助system函数,在上面的程序中收到语音模块的输出的时候,将switch语句处的各个case替换为system函数调用即可:
1 2 3 4 5 6 7 8 9 10 11 12 13 14 15 16 17 18 19 20 21 22 23 ……void * readSerial () char cmd;while (1 ){switch (cmd){case 'N' :"adb shell input swipe 540 1300 540 500 100" );break ;case 'P' :"adb shell input swipe 540 500 540 1300 100" );break ;case 'D' :"adb shell \"seq 3 | while read i;do input tap 350 1050 & input tap 350 1050 & sleep 0.01;done;\"" );break ;case 'Q' :"adb shell input keyevent 26" );break ;
最终效果:能够识别我们的语音命令并相应执行到我们的手机上。